Brake Replacement Cost Estimator
Configuration
Estimated Breakdown
Configure your settings and click "Estimate Cost" to see the breakdown.
You hear that high-pitched squeal when you hit the brakes. It’s annoying, but it also signals a potential safety hazard. Most drivers know they need new brake pads is the friction material pressed against the rotor to slow down your vehicle. But here is the big question that usually pops up at the mechanic's counter or while browsing online parts stores: do you really have to replace all four sets of brake pads at once?
The short answer is no. In most cases, you only need to change the front brake pads. However, saying "no" without context can lead to expensive mistakes later on. To make the right call for your car and your wallet, we need to look at how braking systems actually work, why wear isn't always even, and when replacing all four might actually be the smarter move.
Why Front Brakes Wear Out Faster Than Rear Brakes
To understand why you rarely change all four brakes simultaneously, you have to understand physics. Specifically, weight transfer. When you slam on your brakes, your car’s momentum wants to keep moving forward. This causes the weight of the vehicle to shift dramatically toward the front end.
Think about riding in a car that stops suddenly. Your body jerks forward, right? The same thing happens to the car itself. During hard braking, up to 70% of the stopping force is handled by the front wheels. The rear wheels contribute much less, often handling only 30% of the load. Because the front pads are doing significantly more work, they generate more heat and friction, leading to faster wear.
This imbalance means that if your front pads last 40,000 miles, your rear pads might easily go 60,000 or even 80,000 miles before needing attention. Replacing the rear pads just because you changed the fronts would be like throwing away half-full milk cartons every time you buy a new one. It’s wasteful and unnecessary.
The Rule of Axles: Never Mix Left and Right
While you don’t need to replace all four corners, there is a strict rule you must follow: always replace brake pads in pairs on the same axle. If your left front pad is worn out, you replace both the left and right front pads. Never replace just one side.
Here is why mixing old and new pads on the same axle is dangerous. New pads have a different thickness and friction coefficient than worn ones. If one side has new pads and the other has old, thin pads, the calipers will apply uneven pressure. This can cause your car to pull sharply to one side when you brake, making steering unpredictable. In an emergency stop, this pull could send you into oncoming traffic or off the road.
Furthermore, uneven pad thickness leads to uneven heating. One rotor might get hot enough to warp, while the other stays cool. Warped rotors cause vibration in the steering wheel, which is another repair bill you didn’t need.
When Should You Replace All Four Brakes?
There are specific scenarios where changing all four sets of brake pads makes sense. Ignoring these signs can lead to premature failure of the new components you just installed.
- High Mileage Vehicles: If your car has over 100,000 miles and you haven't done a full brake job in years, it’s worth checking all four. Sometimes, aggressive driving habits or heavy loads (like towing) can wear rear pads faster than expected.
- Rear Drum Brakes: Some older cars or smaller economy models use drum brakes in the rear. These last much longer than disc brakes, so you’ll almost never change them with the fronts. However, if your car has disc brakes all around (four-wheel disc), the rear discs might still be viable, but check the thickness.
- Severe Driving Conditions: Do you live in a hilly area like Bristol or drive in heavy city traffic with constant stop-and-go motion? These conditions increase rear brake usage slightly due to engine braking assistance and frequent low-speed stops. If your rear pads are below 3mm thick, replace them along with the fronts.
- Worn Rotors: If your rear rotors are scored, warped, or near their minimum thickness limit, you should replace the rear pads too. Putting new pads on old, damaged rotors ruins the new pads quickly and reduces braking efficiency.

How to Check Your Brake Pad Thickness
You don’t need to be a professional mechanic to see if your brakes are dying. You can perform a visual inspection yourself. Here is how to do it safely and accurately.
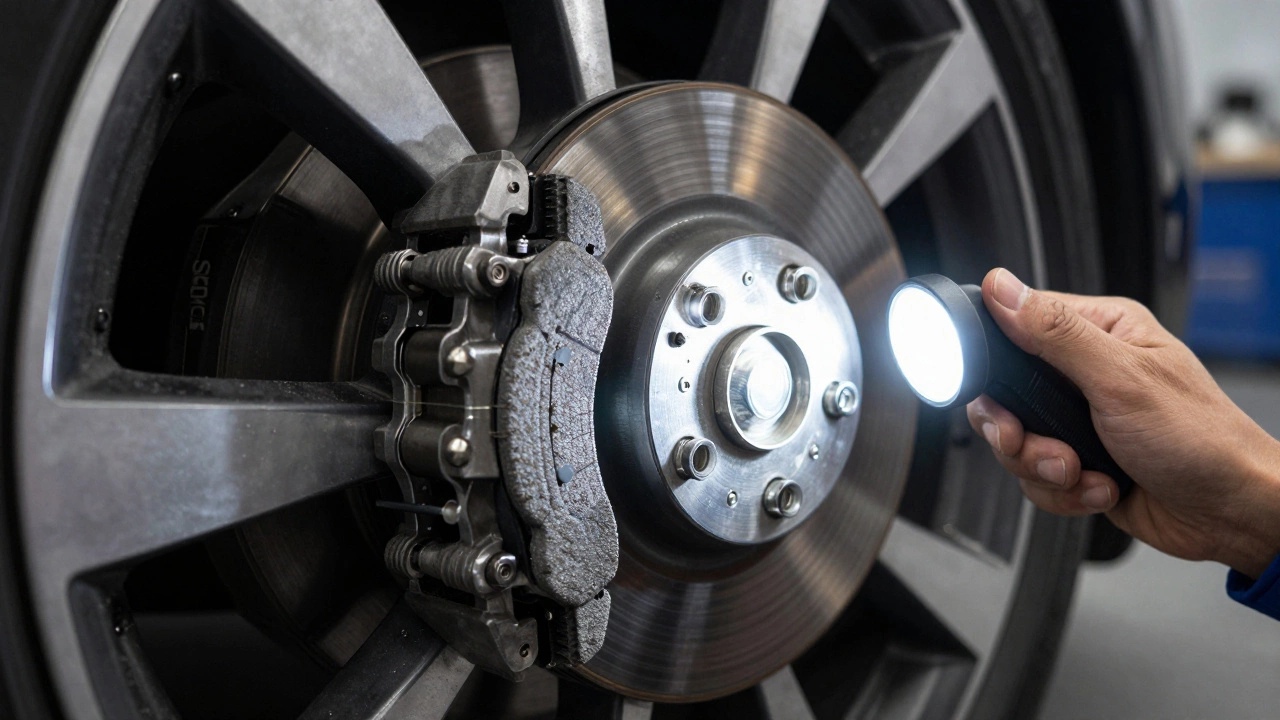
- Look Through the Wheel Spokes: Park your car on a flat surface. Use a flashlight to shine through the gaps in your alloy wheels. You are looking for the brake caliper assembly behind the rotor.
- Identify the Pad: The brake pad sits inside the caliper, sandwiching the rotor. Look for the friction material. It should be a dark grey or black block.
- Estimate Thickness: Compare the pad thickness to the metal backing plate. New pads are usually about 12-14mm thick. If the friction material looks thinner than a £1 coin (about 2.5mm), it’s time to replace them. If you can see the metal backing plate touching the rotor, you’ve already gone too far.
- Check for Squealers: Many modern pads have a small metal tab called a wear indicator. When the pad wears down, this tab scrapes against the rotor, creating that annoying squealing noise. If you hear it, your pads are critically low.
If you’re unsure, pop the wheel off. Removing a wheel takes about 10 minutes with a jack and lug wrench. Once the wheel is off, you can clearly see the entire brake assembly. Measure the pad with a ruler or caliper for precision.
Front vs. Rear Brake Replacement: Cost and Labor
Replacing brake pads is one of the most common DIY car maintenance tasks. However, labor costs vary depending on whether you tackle just the front or all four corners.
| Component | Front Only | All Four Corners |
|---|---|---|
| Parts Cost (Standard Pads) | £40 - £80 per axle | £80 - £160 total |
| Labor Time (DIY) | 1 - 1.5 hours | 2.5 - 3.5 hours |
| Professional Labor Rate | £60 - £90 | £120 - £180 |
| Additional Parts Needed | Caliper lubricant, brake cleaner | Same, plus possibly rear caliper pistons |
Note that rear brakes often require more disassembly. On some cars, you have to compress the rear caliper piston with a screwdriver because it threads inward as it retracts. Front calipers usually just push straight back. This extra step adds time and complexity to a rear brake job.
Common Mistakes to Avoid During Brake Replacement
Even experienced DIYers make mistakes when swapping brake pads. Avoid these pitfalls to ensure your brakes perform correctly and safely.
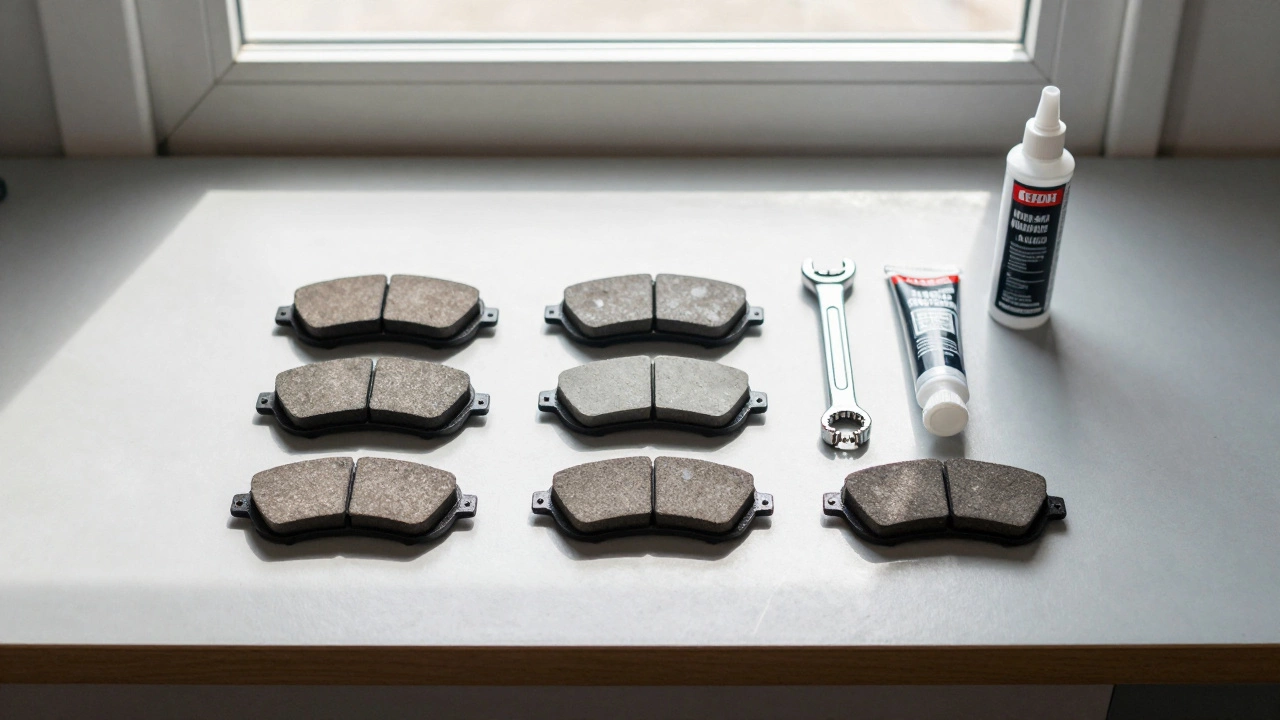
- Not Lubricating Slide Pins: The caliper slides on pins. If these are dry or corroded, the caliper won’t release fully after braking. This causes drag, overheating, and rapid pad wear. Clean and grease the slide pins with high-temperature brake grease every time you change pads.
- Skipping Brake Fluid Check: As you push the caliper piston back to fit the new, thicker pads, you force brake fluid back into the master cylinder. Make sure the reservoir cap is open and the fluid level doesn’t overflow. Old fluid absorbs moisture, so consider flushing it if it’s been over two years.
- Failing to Bed In New Pads: New pads need to mate with the rotors. For the first 200 miles, avoid hard stops. Perform several moderate decelerations from 30 mph to 10 mph to transfer a layer of friction material onto the rotor surface. This ensures maximum braking power and prevents judder.
- Ignoring Dust Shields: Behind the rotor is a thin metal dust shield. If you bend it during installation, it can rub against the rotor, causing noise and damage. Handle it gently.
Signs Your Brakes Need Immediate Attention
Don’t wait for a scheduled service to check your brakes. Pay attention to these warning signs that indicate urgent repair needs.
- Squealing or Grinding Noises: High-pitched squeals mean the wear indicators are touching. Grinding sounds mean metal-on-metal contact, which damages rotors and requires immediate replacement.
- Vibration in Steering Wheel: If the steering wheel shakes when you brake, your front rotors are likely warped. This often happens if you’ve been riding your brakes downhill or stopping hard repeatedly.
- Pedals Feel Soft or Spongy: This usually indicates air in the brake lines or leaking brake fluid. This is a critical safety issue. Do not drive until resolved.
- Car Pulls to One Side: Uneven braking force suggests a stuck caliper or contaminated pads (oil or grease). This requires diagnosis before simply replacing pads.
Choosing the Right Brake Pads for Your Car
Not all brake pads are created equal. The type of pad you choose affects noise, dust, and performance. Here are the three main types available in the UK market.
- Semi-Metallic: Made with 30-65% metal fibers. They offer excellent heat dissipation and durability, making them great for heavier vehicles or performance driving. However, they tend to be noisier and produce more brake dust.
- Ceramic: Made from ceramic fibers and copper fillers. These are quieter, produce less dust, and last longer than semi-metallic pads. They are ideal for daily commuters who want a clean, quiet ride. They are generally more expensive upfront.
- Organic (NAO): Made from glass, rubber, and carbon. They are soft and quiet but wear out quickly and fade under high heat. Best used on light vehicles with gentle driving styles.
For most British drivers commuting in cities like London, Manchester, or Bristol, ceramic pads offer the best balance of comfort, cleanliness, and longevity. If you tow a caravan or drive a sports car, stick with high-quality semi-metallic pads.
Final Thoughts on Brake Maintenance
So, do you change all four brakes? Generally, no. Focus on the front axles first, as they bear the brunt of stopping power. Always replace pads in pairs to maintain balanced braking. However, always inspect the rear pads and rotors during any brake job. If they are close to wearing out, replacing them now saves you labor costs later.
Regular maintenance extends the life of your braking system. Check your brake fluid levels monthly, listen for unusual noises, and feel for vibrations. By staying proactive, you avoid emergency repairs and ensure your family’s safety on the road. Remember, brakes are the most critical safety component of your vehicle. Don’t compromise on quality or timing.
Can I replace front brake pads myself?
Yes, replacing front brake pads is a straightforward DIY task for most cars. You will need a jack, jack stands, a lug wrench, a C-clamp or piston tool, brake cleaner, and high-temperature grease. Follow a vehicle-specific guide to ensure proper torque specifications for caliper bolts and lug nuts.
How long do brake pads typically last?
On average, brake pads last between 30,000 and 70,000 miles. Front pads usually wear out sooner than rear pads due to higher stopping forces. Aggressive driving, heavy traffic, and towing can reduce lifespan significantly, sometimes requiring replacement as early as 20,000 miles.
Is it safe to drive with worn brake pads?
No, it is not safe. Worn pads reduce braking efficiency and increase stopping distances. If the metal backing touches the rotor, it causes permanent damage to the rotors, leading to costly repairs. Listen for squealing or grinding noises as immediate warnings to stop driving.
Should I replace rotors with new brake pads?
Not always. Inspect rotors for deep scoring, warping, or cracks. If the rotor thickness is above the manufacturer's minimum specification and the surface is smooth, you can reuse them. However, if rotors are glazed or uneven, replace them to ensure optimal performance of the new pads.
What causes brake squealing?
Brake squealing is often caused by wear indicators contacting the rotor, indicating low pad thickness. It can also result from hardened shims, lack of lubrication on contact points, or glazed pads. Using ceramic pads and applying anti-squeal shims can help reduce noise.